Wednesday, April 22, 2009

Set up Monitor Screen Resolution


The Computer Monitor or Laptop Screen can be set to different screen resolutions and different numbers of colors. For optimum viewing of web pages, the recommend monitor setting is at least 800 X 600 pixels with thousands of colors.

Screen Resolution
Many people think that, the means of Resolution is in terms of Photography or Television. In those media, resolution indicates picture sharpness.

But in the computer world, Screen Resolution means to the dimensions of the pixels displayed on the screen. The computer probably preset to a resolution of 800 X 600 pixels. That means that the monitor will display a screen that is 800 pixels wide and 600 pixels high. The Screen Resolution does not determine by the size of Monitor. But for bigger Monitor, larger Screen Resolution can be use.

For 14” or 15” Monitor à switch the resolution from 800 X 600 to 1024 X 768, depend upon the Graphics Card/ VGA Support. Everything will get smaller as the resolution increases because the monitor is displaying a larger number of pixels in the same screen space.

For viewing web pages generally high resolution is require for more web pages fit on the Screen. A larger resolution allows seeing more of the page without scrolling.
Here are few steps to fit Monitor Resolution (for Windows Users only):
  • Click Start > Control Panel


  • From Here double-click on the Display icon. Display Properties will appear.


  • Click on Settings Tab to see the current resolution. Here you can change the resolution depending on the Monitor size.
For 14” or 15” Monitor > 800 X 600 is recommended.
For 17” Monitor > 1024 X 768 is recommended.
For more than 17” > 1280 X 1024 or higher is recommended.

Screen Colors Quality:
The Number of Colors is also important. For designing professional graphics or a digital photography aficionado and have a computer loaded with memory, The recommended setting is -- 32 bit. Otherwise the Medium setting --16 bit or 64,000 colors is recommended. This is a practical resolution to use on the Web.


Shortcut Keys for Microsoft Windows | Tips for Windows – 2000, NT, XP, Vista:


Here is list of some common Shortcut Keys for Windows: 2000, NT, XP and Vista

Use at your own risk


Alt + Tab à Switch between open applications.

Alt + Shift + Tab à Switch backwards between open applications.

Alt + double-click à Display the properties of the object that double-click on.

 Ctrl + Tab à With an application that has multiple sub tabs/document windows, this switch between tabs.

Ctrl + Shift + Tab à Same as above but backwards.

Alt + Print Screen à Create a screen shot (image in clipboard) only for the active Program/Screen.

Print Screen à Create a screen shot (image in clipboard) for your entire desktop.

Ctrl + Alt + Del à Reboot the computer and/or bring up the Windows task manager.

Ctrl + Esc à Bring up the Windows Start menu. In Windows 3.x this brings up the Task Manager.

Alt + Esc à Switch between open applications on taskbar.

F1 à Activates help for current open application.

F2 à Renames selected Icon.

F3 à Starts find from desktop.

F4 à Opens the drive selection when browsing or pull the list of drive selections.

Alt + F4 à Closes Current open program.

Ctrl + F4 à Closes Window in Program.

F5 à Refresh.

F6 à Move cursor to different Windows Explorer panel.

F10 à Activates menu bar.

Shift + F10 à Simulates right-click on selected item.

Ctrl + Space bar à Drops down the window control menu.

Ctrl + (the '+' key on the keypad) à Automatically adjust the widths of all the columns in Windows explorer.

Alt + Enter à Opens properties window of selected icon or program.

Shift + Del à Permanent Delete - Delete programs/files without throwing them into the recycle bin.

Holding Shift at Startup à Boot safe mode or by pass system files as the computer is booting.

Holding Shift à When putting in an audio CD, will prevent CD Player from playing.

Enter à Activates the highlighted program.

Alt + Down arrow à Display all available options on drop down menu.

* (on the keypad) à Expands all folders on the currently selected folder or drive in Windows Explorer.

+ (on the keypad) à Expands only the currently selected folder in Windows Explorer.

- (on the keypad) à Collapses the currently selected folder in Windows Explorer


Related:

Use Screensavers to prevent Unnecessary Phosphors Glow:


The main purpose of using Screensavers in Computer Monitor was to protect burning of Phosphors.

Early monitors had problems with the same image being displayed over and over for long periods of time.

The phosphors, used to make the pixels in the monitor display, it glows at a constant rate, for such a long period of time that they could cause harm of discolor the glass surface of the monitor.


This Discoloration of the Monitor could be visible as a faint image overlaying whatever else was shown on the screen. Today due to the Advances in Display technology, the creation of energy-saver monitors have virtually eliminated the need of screensavers.

Entertainment is the most common reason for use Screensavers, they just look good. However, Some Screensavers can also use for security; these can be set up with a password so that when anyone walk away from the computer and know it is safe.

Related Articles:

Wednesday, April 15, 2009

Setup Browsers Home Page | How To

When we launch a Browser, first a predefined web page appears. This page is called home page or start page.
If we want to set a particular page as our home page that means, when we launch Internet Explorer or any other web browser, the google front page (for example) should be appears on the first page.
We can set our own company / blog site or any other favorite site we like as home page.

Just follow the following simple steps to set a home page:

Internet Explorer:
  • Open Internet Explorer Browser.
  • Go to Tools -> Internet Options.

  • Select General tab, type desired web address in the address box. You can leave it Blank or can Use Current or set to Default.


  • Finally click “Apply” and “Ok”.

Opera Browser:
  • Open Opera Browser.
  • Go to Tools -> Preferences.

On the General tab type desired web address in the Home page address box or you can use current home page.

  • Finally click “OK”.

Netscape Browser:
  • Open Netscape Browser.
  • Go to Tools -> Options.

  • Select General Tab, type desired web address in the Location(s) box. Here you can use Current Pages / Select a page from Bookmark or Leave it Blank.

  • Finally click “OK”.
FireFox Browser:
  • Open Firefox Browser.
  • Go to Tools -> Options.
  • Type desired web address in address box. In the Home page section Click Use Current Button, if you don’t want to change it.


  • Finally, click on the “OK“ button.
Enjoy!


Related:
Download YouTube Videos
How to Open a FaceBook Account

How to Change Windows XP login password


This tip shows how to change Login Prompt in Windows XP with “Local Account”. It can only apply for local user accounts.

Just follow the simple steps bellow:

  • From Desktop, Click on "Start" -> "Run".
  • Then type in "control userpasswords2" and press Enter.


  • The "User Accounts" dialogue box will appear. Press "Alt + Ctrl + Del".
  • Click "Change Password".
  • A "change password" Dialogue box will appear. Type your "Old Password" once and type your "New Password" twice.
  • Click "Ok".


* Use this trick at your own risks


Related:
Disable Windows XP Login Prompt for Password

How to Disable Windows XP login prompt for password


This tip shows how to disable the Login Prompt in Windows XP with “Local Account”. It can only apply for local user accounts.

It allows User to bypass the login prompt on Windows XP startup and go straight to the desktop without login.

Just follow the simple steps bellow:
  • From Desktop, Click on "Start" > "Run".
  • Then type in "control userpasswords2" and press Enter.


  • Uncheck the box for "Users must enter a user name and password to use this computer."

  • Click "Apply" and "Ok".
Use this trick at your own risks

Enjoy!


Related:
Hide My Recent Documents Menu
Hiding Icons on the Desktop
Disable or Turn Off AutoRun in Windows
Hiding Icons on the System Tray
Changing Windows XP Login Password

Tuesday, April 14, 2009

Hide My Recent Documents Menu


The last files opened will be displayed on My Recent Documents menu. Anyone can access those recent used files from this menu. But we can hide this menu.

Just follow the simple steps bellow to hide My Recent Documents menu:

  1. Click Start -> Run.
  2. Type "regedit" and press Enter.
  3. Go to HKEY_CURRENT_USER -> Software -> Microsoft -> Windows -> CurrentVersion -> Explorer -> Advanced.
  4. On the right window of the Registry Editor, right-click on the empty space.
  5. Choose New -> DWORD Value.
  6. Type "Start_ShowRecentDocs" and press Enter.
  7. Right-click the new key you've made and choose Modify.
  8. On the Value Data type the number "0" to hide My Recent Documents.
  9. Press OK.
  10. Restart Computer.


Enjoy!


Related Tips:

Hiding Icons on the Desktop


Don’t you want to see icons on your Desktop?

If you don't like to see the icons on the desktop of your computer, you can hide them.

Just follow the simple steps bellow:


  • Click Start -> Run.
  • Type "regedit” and press Enter.
  • Go to HKEY_CURRENT_USER -> Software -> Microsoft -> Windows -> CurrentVersion -> Policies -> Explorer.
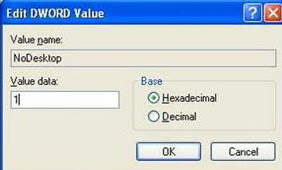
  • Right-click on the right side of Registry Editor Window and choose DWORD value.

  • Type a new value name "NoDesktop".

  • Right-click this new value name and click Modify.

  • Type "1" on the value data to hide the icons.

  • Click OK.

  • Restart Computer.


Enjoy!


Related:
Disable AutoRun Feature in Windows
Hide Icons in System Tray
Hide My Recent Documents Menu

Disable or Turn Off AutoRun in Windows


To Disable or Turn Off autorun from your Computer

Just follow the simple steps bellow:

  1. Click Start > Run.
  2. Type "regedit" and press Enter.
  3. Go to HKEY_CURRENT _USER -> Software -> Microsoft -> Windows -> CurrentVersion -> Policies -> Explorer.
  4. On the right window of registry editor, right-click on NoDriveTypeAutoRun.
  5. Then click Modify.
  6. Change the value data into "ff" to disable auto-run function on the drive.
  7. Click OK.
  8. Then go to HKEY_USERS -> DEFAULT -> Software -> Microsoft -> Windows -> CurrentVersion -> Policies -> Explorer.
  9. Follow Step no 4 to Step no 7.
  10. Exit from Registry Editor.
  11. Restart Computer.


    Enjoy!

Related:
Hide Icon in System Tray
Hiding Icons on Desktop
Hide My Recent Documents Menu

Hiding Icons on the System Tray


In the System Tray there are usually several icons.

If you want to hide those icons from your System Tray,

Just follow these steps to hide them:

  1. Click Start -> Run.
  2. Type "regedit" and press Enter.
  3. Go to HKEY_CURRENT USER -> Software -> Microsoft -> Windows -> Current Version -> Policies -> Explorer.
  4. On the right window of registry editor, right-click on the empty space.
  5. Choose New -> DWORD Value.
  6. Type the value name "NoTrayItemsDisplay" and press Enter.
  7. Right-click the new key you've made and choose Modify.
  8. On the Value Data type the number "1" to hide the icons.
  9. Press OK.
  10. Restart Computer.

Enjoy!


Related:
Hiding Icons on Desktop
Disable AutoRun Feature in Windows
Hide My Recent Documents Menu

Monday, April 13, 2009

Download YouTube Video | EASY Way


Adding pwn:
  • View a video on YouTube.
  • In the URL location box, type pwn in front of youtube, and press enter.
  • Look at the Figure bellow:
Before type pwn:


After type pwn:

  • Get links to download the video.
  • Click on Download Standard Quality Video (FLV). Or Click on Download High Quality Vide (MP4).


• Adding pwn:
  • View a video on YouTube.
  • In the URL location box, type kiss in front of youtube, and press enter.
  • Look at the Figure bellow:
Before type kiss:

After type kiss:
  • Get links to download the video. Enter youtube URL and click Go.
  • Look at the Figure bellow:

You can download FLV Player (FLV Files) or QuickTime Player (MP4 Files) form the following Links:


FLV Player Download Link: https://www.applian.com/flvplayer/

QuickTime Player Download Link: www.apple.com/


Related:
How to open a FaceBook Account

Sunday, April 12, 2009

Sign up for a FaceBook Account


  • On the right hand side of the page there's a green button with “Sign Up” on it, go ahead and click it.
  • On the next page it will ask for name, email and various pieces of information simply fill it out and click the “Sign up Now” button.
  • After doing step 3, Facebook will send a confirmation email to email account you used to register.
  • In order to access your Facebook account you will simply need to click the activation link in this email and then you are ready to sign into your new FaceBook account.


Enjoy !